Key Features:
- Manage the overview: add colums and filters
-
Understanding Objective States
- Creation of a new objective
- Objective Submission Flow
Overview
When you log in to myQ7Leader, go to the Objectives module, you will then arrive on the Overview.

You will see that you can now switch between three different views from the left sidebar :
- Me: View only your own objectives (default).
- Direct Reports: View objectives of your N-1s (direct reports).
- All: View objectives of everyone you have permission to see (based on departmental permissions).
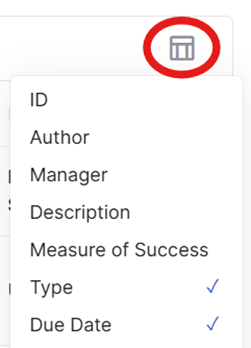
Objectives are shown in a customizable table view:
- Sortable columns by name, with the possibility to add/remove columns (Weight, Target, Last Update, Created Date).
Click on the icon at right and choose what information you want to add in the overview.
- Filters are available above each column to help you find specific objectives quickly.
![]()
By default, all objectives from non-archived cycles are visible to you. If you need to see the current cycle only, filter on the cycle.
Understanding Objective States
Each objective can go through several states, depending on its level of visibility and submission. Here's what each status means:
-
Draft (blue highlight): Only visible to you. The objective has not been shared yet.
-
Saved: Shared and editable by both you and your manager, but not yet submitted.
-
Pending: One party has submitted the objective; waiting for the other to submit.
-
Signed Off: Submitted by both parties. The objective is now locked and cannot be edited, except for feedback and progress fields.
Creation of a new objective (for myself or for my team members as a Manager)
Click on « New Objective » :
- In the “Me” section, if the objective is for yourself as a member.
- In the “Direct Reports” or “All” section, if the objective is for a member of your team.

Then, you will be asked to fill in different fields.
- On the left side, fill in text fields (title, description, etc.)
- On the middle, you have to fill in objective’s settings (weight, due date, etc.)
- On the right, you can fill in the Progress of your objective and add some comments.
Fields marked with asterisks (*) are mandatory.

Objective Submission Flow
- When you click “Save Draft”, the objective is saved only for yourself and remains invisible to others.
- Clicking “Save” shares the objective with your manager or your team member. It is not yet submitted.
- Clicking “Submit” means you approve the current content of the objective.
![]()
What happens next?
If the manager also submits the objective without making any changes, the objective is:
- Signed off : both parts submitted the content.
- Automatically locked for both of you.
- No further edits can be made (except for feedback/progress fields)
What if your manager edits the objective ?
If the manager makes any changes to the objective after you submitted, your submission will be reset.
You will need to submit again to confirm the updated content.
Important:The objective is only signed off when both you and your manager submit the exact same version.
Each objective goes through a clearer submission process :
- Saved : The objective is shared between both member and manager.
- Submitted by Member : The Member clicked on Submit button to approve the content of the objective.
- Submitted by Manager : The Manager submitted the objective for approval.
- Signed Off : Both submitted and the objective is now locked.

All objectives will require submission. Both the manager and the team member will receive email notifications whenever an action is taken on an objective - whether it has been created and shared, approved, or commented on by the other party.
Tips for General Users
- Use filters and columns to customize your view.
- Always submit shared objectives for manager approval.
- You can track the status and progress directly within each objective.