In this article, you will learn how to:
- Create your Areas of Activity
- Create a new RDP
- Review and edit an existing RDP
- Unpublish an RDP
- Assign an RDP to team members
The Role Descriptions and Profiles (RDP) provide detailed information on job roles within the company, including general and specific expectations, management practices and interview questions for new hires.
Permissions
To manage and publish RDPs, your role must have the appropriate permissions enabled in the Role settings. (Manage:rdp and Publish:rdp)
Users with access can only view the Library and cannot make changes.

Set up your Areas of Activity
Areas of Activity define the functional or operational domains within your organization where roles operate.
Setting them up helps categorize roles and organize your RDP (Role Descriptions & Profiles) library.
For example, common Areas of Activity could include Marketing, Finance, Product Development, Customer Support, or Operations.
Assigning a role to the correct Area of Activity ensures reporting, analytics, and role management are accurate and meaningful.
Navigate to: Administration > Role Descriptions and Profiles > Areas of Activity. Then click the "+" icon to create a new one.

How to create a new RDP
Navigate to: Administration > Role Descriptions and Profiles > Library.
Then, click the “+” button at the top-right corner of your screen.

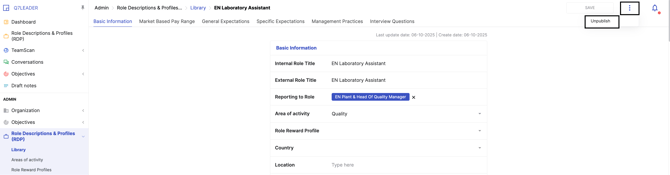
- Step 1: Set up the Basic Information.
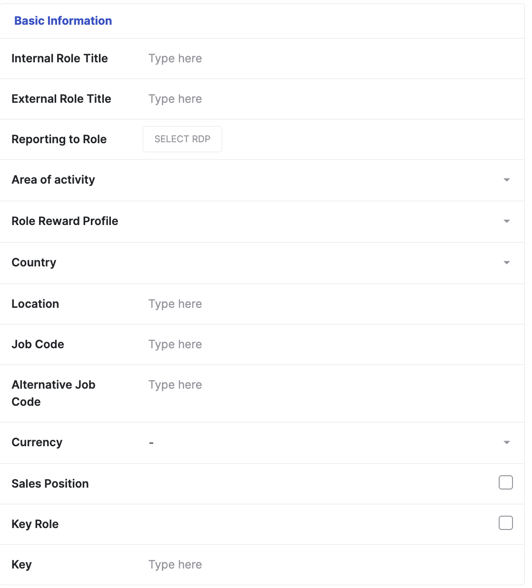
Internal Role Title: The title used within the organization to identify the role. This is for internal reference and HR purposes.
External Role Title: The official title used externally, for example in job postings or public communications. It may differ from the internal title.
Reporting to Role: The role or position that this role reports to within the organizational hierarchy.
Area of Activity: The functional area, department, or business unit where the role operates (e.g., Marketing, Finance, Product Development).
Location: The primary location where the role is based. This can include office location, city, or country.
Key Role: Indicates whether the role is considered critical for the organization’s success. Often a yes/no or flag for strategic importance.
-
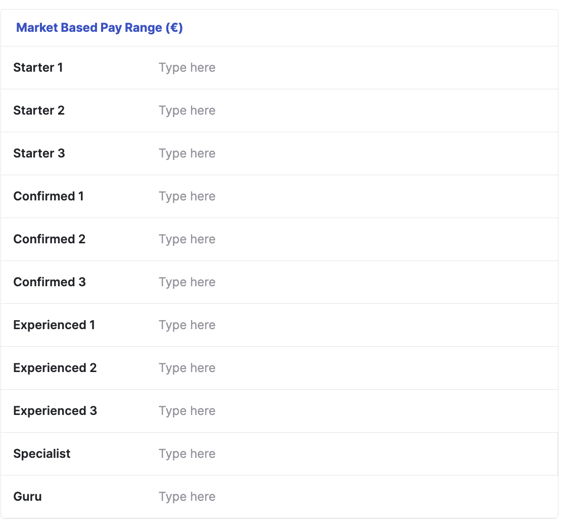
Step 2: Fill in the MBPR Information.
MBPR (€): The Minimum Base Pay Range or salary range associated with the role, expressed in euros. Can be used for compensation planning.
-
Step 3: Choose the General Expectation Profile (1–7)
The General Expectation Profile (GEP) defines the core expectations and responsibilities for the role. Select a profile from 1 to 7 based on the level of the role within the organization. This ensures consistency across roles in the same category and helps managers and team members understand the standard expectations for that position.
-
Step 4: Complete the Specific Expectations of the Role
These are the detailed responsibilities, outcomes, and behaviors that are unique to this role, beyond the general expectations defined by the GEP.
Clearly outlining these expectations helps team members understand what is required of them and provides a basis for performance discussion.
-
Step 5: Save or Publish the RDP
Once you have completed the RDP, you can either save it as a draft to make further edits later, or publish it when it’s finished and ready to be assigned to the team member.
![]()
Saving as a draft allows for review and adjustments, while publishing makes the RDP officially available for assignment and use.
How to edit an existing RDP
-
Navigate to: Administration > Role Descriptions and Profiles > Library.
-
Click the pencil icon on the right to review and edit the information in the RDP.

By clicking the three dots icon, you can also access additional options, such as:
-
Edit
-
Export PDF
-
Duplicate
-
Archive: To archive the RDP, you must first unpublish it.
-
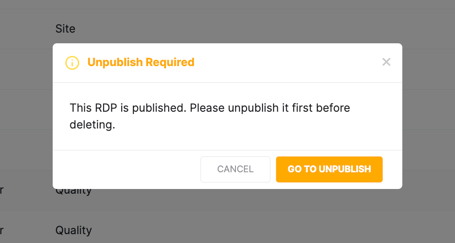
Delete: To delete the RDP, you must first unpublish it.

If you want to delete an RDP that has already been published and assigned to a team member, an assistant will appear to guide you through the unpublishing process first.
Click "Go to Unpublish" and follow the steps below to unpublish your RDP.
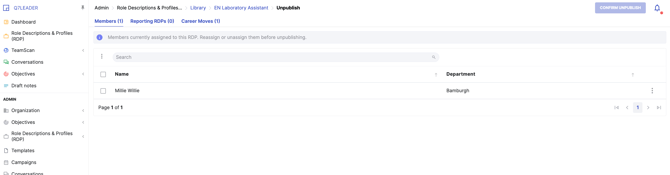
How to Unpublish an RDP
Before archiving or deleting an RDP, you must first unpublish it.
-
Open the relevant RDP in the RDP Library.
-
Click the three dots button located in the top-right corner of the screen and then choose "UNPUBLISH".
-
If a team member is assigned to the RDP, if another RDP reports to this role, or if a career move is planned for it, a notification message will appear to guide you through the required steps before the RDP can be unpublished.
-
If several team members are assigned, you can use the bulk action feature by selecting the relevant team members and clicking the three dots on the left side. Consult this article for more information.
-
To unassign a team member individually, select the relevant row and click the three dots on the right side of that row.

You will then have the following options:
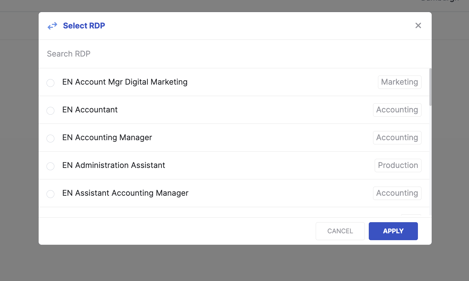
- Reassign: assign a new RDP to the team member:
- Remove: simply unassign the current RDP from the team member.
-
Once unpublished, the RDP can then be archived or deleted.
Assign an RDP to team members
You can assign RDPs manually for small teams. For larger populations, you can assign them through an import process.
For detailed instructions, please refer to the related article.
-
To assign an RDP to a team member, go to Administration > Team Members and select the row corresponding to the team member.
-
Click the pencil icon to enter your Team Member:

-
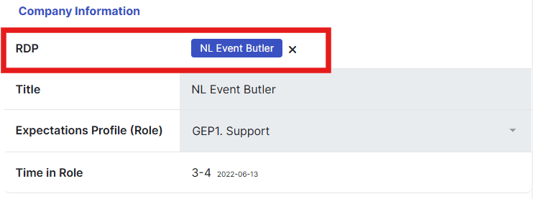
In the Basic Fields and Company Information section, update the RDP by selecting the desired profile.
-
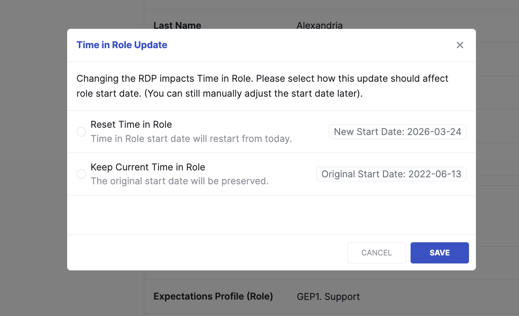
When changing the RDP, an assistant will prompt you to either reset the Time in Role to today’s date or keep the current Time in Role. The selected date will then be preserved.